Monday, August 26, 2013

Sewing Lesson: Altering ("Fitting") a Dress Shirt

This is sort of an "instructable" on tailoring (taking in) a dress shirt to fit better around the middle. I started this about a month ago and finally got around to it. You don't have to measure anything, but you do have to own at least one shirt that fits you well. For this shirt, I used a serger, but you can use this method with a regular sewing machine if you want. If there's any interest, I'll put up another tutorial later on other seam options as I recently hit the dress shirt mother lode (my uncle gave me a bunch that I need to take in).  If you don't want to wait for me and are curious about a "French" seam (which is used to finish most decent dress shirts), check this out.

Tools & Materials: seam ripper, thread that matches the shirt you plan to alter, stitch glue (or superglue), iron/ironing board, sewing machine and/or serger, small scissors. If you just have access to a serger, you can finish by hand, but you'll also need a needle for hand-stitching.

Safety disclaimer: keep your fingers out of the works. It's going to sound pretty un-manly but a sewing machine is a power tool, too. I watched my mom sew her finger once with a sewing machine. When it happened, she jerked back and broke the needle off in (through!) her finger. Not pretty. Dad got it out with a pair of needle-nose pliers while mom puked in the sink. A serger has a blade that cuts while it stitches. Watch out for that, too.

Here's a little shirt anatomy:
Step 1: with a seam ripper, rip out the hem at the bottom of each seam you want to alter for 1-2" in each direction. If it's a shirt you plan to wear un-tucked, you should be fairly meticulous when ripping the seam so you don't tear the fabric. If you're finishing by hand, only remove as much seam as you need to make the fabric lie flat when the hem is opened up.
Step 2: button the shirt and turn it inside-out.

Step 3: find a shirt you like that fits you well. Button it and turn it inside out.

Step 4: put the shirt that fits you on top of the shirt you want to alter. Line up the shoulders and centers of the shirts. The armpits should line up as well if they are similar size.

Step 5: transfer the shape of the shirt that fits you onto the one that doesn't using some kind of marker, leaving yourself a little extra room (1/8" or so) for mistakes. I use a Sharpie because I can actually see the bold line, and I figure that I'm going to cut off the marker line anyway, so it won't bleed in the wash and stain my shirt. You can faintly make out the dotted line in the picture below. With a dark shirt, fabric pencil or chalk will probably work better. Pin on your line to hold the shirt where you want it. Both layers of fabric (the front and back of the shirt) should lie flat.

Step 6: sew on/just inside your line. If you are using a serger, the machine will cut the fabric as you sew and "overlock" the seam, leaving a finished edge that won't fray. Pretty awesome. Fray check or superglue the ends of the overlocked seam.

Step 7: fold and iron the hem at the bottom of each seam so it lies flat (as it did before you started). Switch to your regular sewing machine, and install the thread that matches your shirt's fabric. Try to match the stitch length to make it pretty (you can test this on a scrap). You can do this by hand as well.

Step 8: turn your altered shirt right side-out and double-check your seam. Sometimes the thread color from the serger will show through (I usually use whatever color is on the serger as 1) I'm cheap so I don't have a full pallette of serger thread colors, and 2) the threads (4 of them!) are a pain to change). In that case, turn the shirt back inside-out and, using your regular sewing machine with the thread that matches your shirt, stitch right on the serger stitch close to the shirt body. Turn right side-out and triple-check the seam.

Step 9: try on your shirt. Congratulations, it fits much better! I might wear this one on Friday for the Los Alamos Concert Series concert featuring D.K. & THE AFFORDABLES!

Tuesday, August 20, 2013

Life's whirlwind keeps spinnin'!

Between work, family, life, music, and art, it's been hard to squeeze in time to exercise or meditate or do anything else, for that matter. Still, if I can walk every day and squeeze in a couple runs during the week I'm pretty happy. It is time to get back on the bike, though, and maybe back in the gym.

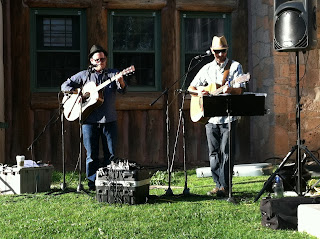
I did manage to debut 4 original tunes at a recent gig (8/16 for the opening of "Trickster," a show at the Fuller Lodge Art Center that my wife and I both had fine art pieces in; see my previous "Fly Art" posts) where I actually played guitar. First time in a few years. My fingers were blistered, when it was all said and done, but I was pretty happy with how the gig turned out and how quickly my (admittedly limited) guitar skills came back. My good friend and band mate DK joined me (also on acoustic, which was also weird for him as he's an electric player), adding leads and a few of his originals as well. Thanks to our friend and bandmate Rob for loaning us his (AWESOME) PA system. Here's a pic from the event (thanks to my lovely wife!):
(man, look at those nerds!)
I've been gigging pretty heavily with the Affordables, though we had a couple weeks off. Coming up, we are playing this Thursday (8/22) at the Cowgirl Hall of Fame restaurant in Santa Fe, which hopefully will get us a toe in the door on the other side of the Rio Grande. Friday 8/30 we are playing the Gordon's/Los Alamos Concert Series gig, our first as headliners (we opened in 2011 for Junior Brown (!) and in 2012 for the Tiho Dimitrov Band). September 14 we're back at the Pajarito Brewpub and Grill. After that, I hope to get back into the "swing" of the jazz band. The gig schedule for The Craig Martin Experience has been pretty quiet lately, but may pick up with the holidays approaching.

Yes, I'm still thinking on that alteration instructable I promised. It'll happen!

Have a great week!

Friday, August 9, 2013

Fly Art--Shadow Boxes

My recent "Fly Art" posts showed pieces I submitted to an upcoming show. They were accepted to the show and therefore needed frames. Shadow boxes were a great solution, but I could not find any for sale in the right size (3" x 3" inside). So, I made my own. Here's how:

1) Using the table saw, I prepared my own molding from scrap wood I had lying around. Here's a section of molding I had left over, to give you an idea of the cross-section. I originally cut the molding to have a 1/4" lip, but decided that was too deep and planed it down to 1/8" using my block plane.
2) I cut the molding into mitered (the ends had 45 degree angles) sections on the chop saw (aiming for 3" square on the inside). I clamped a block on the fence of the saw so that all pieces would be exactly the same length. The pieces were short, so in order to keep my fingers intact, I used a scrap stick to hold the molding for each cut.

3) I glued the frames up using an ingenious technique outlined in Fine Woodworking (#205, May/June 2009, p.65) a while back--blue painter's tape as a clamp (I've also seen regular ol' masking tape, packing tape, and electrical tape, but I like the blue stuff the best because it comes off easiest). I taped the sections end-to-end, as tightly as possible, spread glue (Titebond) on half of each joint, and taped the final corner as tightly as possible. This is a fantastic method for small boxes and frames (I also used it for the fly tying box outlined in an earlier post). After drying overnight and scraping off any dried glue that squeezed out of the joint, the frames were ready to begin finishing. Here is a picture of them after priming.
4) The great folks at Village Arts in Los Alamos cut the glass for me. It was $1.30 for all 3 pieces.

5) I filled the corners, bigger dings, knots, etc. with Rock Hard Water Putty, sanded with 150 then 180-grit sandpaper, and wiped down with a cloth. I painted the frames gloss black (3 coats) on the outside and left the inside natural.

6) I glued the glass in place using clear silicone. That was time consuming and tedious as I only had a 1/8" lip to work with and the glass was a bit undersized. I added the silicone using a 5 cc syringe and a 16G blunt-tipped needle. As an added structural measure, I glued in a small shim to sandwich the glass between the shim and the lip. Here's a look at the painted frames with the glass installed.
7) I mounted my art pieces on plywood with spray contact adhesive and fit them inside the frames. I glued the plywood in place (more Titebond), signed, labeled, and dated the backs, and stamped them with my logo (using my hand-cut stamp). The back of one:
The finished products, from left to right-Elk Hair Caddis, Parachute, Copper John:
And now I know one way to make a shadowbox!